• Home
  • About Us
    • Our Mission and Vision
    • The Youth Workin’ It Team
      • Shae Pepper, Managing Director
      • Stephen Pepper, Operations Director
    • Recommendations for the Youth Workin’ It Team
  • Youth Work Resources
    • How To Plan A Youth Retreat Book
    • 52 Scavenger Hunt Ideas
  • Contact Us

Youth Workin' It

Consultancy and Resources for Youth Workers and Organizations Worldwide

  • Youth Group Games
  • Session Plans
  • Fundraisers
  • Youth Retreats
  • Life Skills
  • Interview Skills
  • Scavenger Hunts
  • Would You Rather Questions
  • Program Administration
  • Policies & Procedures
  • Youth Participation
  • Group Agreement

How To Create A Youth Registration Form

July 18, 2012 By Stephen Pepper Leave a Comment

Youth registration form templateA couple of weeks ago, we showed you how to create a youth group permission slip – this week, we’re going to cover how to create a youth registration form, as well as giving you a free template you can use.

To clarify the difference between the two types of forms, the permission slip is for when you plan special events, trips or activities, whereas the registration form is a form that’s to be completed when the young person first joins your youth group or project.

Each youth group will have different requirements as to what information is collected from parents/guardians, but here is a list of details that every registration form will usually need to have included:

  • First & last name of youth
  • DOB
  • Address
  • Email address
  • Phone number
  • Parent/guardian name
  • Relationship to youth
  • Email address
  • Cell phone number
  • Home phone number
  • Other important information (e.g. medical info, allergies, special needs, etc)
  • Parent/guardian signature

Here are some other details that you may wish to collect on the form:

  • Names of siblings who are also in the group
  • Photo release form
  • Other emergency contact details
  • Parental acceptance of youth behavior policy

If you just need a basic form requiring information from the first bullet list, please feel free to download and use this free youth registration form template.

Question: What other information do you ask for on the youth registration forms you use for your youth group or project? We’d love to hear in the comments below.

You can also connect with us by:

  1. Signing up to receive our posts via email
  2. Following us on Twitter
  3. Liking us on Facebook
  4. Signing up to our RSS feed


Armor Of God Lesson For Young People

June 21, 2012 By Stephen Pepper Leave a Comment

Armor of God lessonThis week’s youth work session plan is based on the Armor of God from Ephesians 6:10-18. The free youth work session plan ideas we provide on Thursdays are often tailored more towards non-faith based organizations. We know that we get many Christian youth workers reading our posts though, so we want to provide resources specifically tailored for them too.

The Armor of God is a subject that can seem quite dry to young people, what with belts of truth, helmets of salvation, etc. However, I’ve seen it explained in the following way and thought it was a really creative way of covering the subject, so wanted to share it here. The object lesson part of it will help visual learners in your group stay engaged and will help all the young people remember the Armor of God lesson, no matter what their learning style.

Armor of God

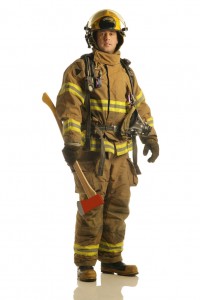
For this Armor of God lesson, you’ll need to recruit a firefighter with his protective equipment to be an object lesson. If you have any firefighters who are members of your church, then hopefully they’d be happy to help. If not, contact your local fire station and see if any firefighters from there would be willing to help.

If this proves impossible, put together some Powerpoint slides with images of the different pieces of firefighter equipment to maintain the visual part of the lesson.

Bring the firefighter and his protective equipment up the front. Read through Ephesians 6:10-18 and tell them that the firefighter is going to help explain what this all means.

1) Belt Of Truth

Firefighters carry belts that carry their gloves and the tools they need. Without the gloves, they wouldn’t be able to protect their hands or hold things in place securely. Without the tools, they wouldn’t be able to perform some important functions in fighting fires or freeing people in car accidents. The belt helps to keep all these close at hand, while keeping the rest of the protective clothing in place.

For Christians, the Belt is made of Truth. This truth helps keep the other items in the Armor of God in place, while also keeping us secure in the knowledge of our salvation.

2) Breastplate of Righteousness

For soldiers, the breastplate protected vital organs like the heart and lungs from swords and arrows. For firefighters, this takes the form of a protective jacket. The jacket is specially insulated with three protective layers to stop them from getting burned, giving them confidence that they’re protected when faced with fire.

The Breastplate of Righteousness does something similar – it provides us with the confidence that we have a right standing with God. This gives us the strength to live in a way that pleases God, but carries with it the responsibility to live righteously – to do what is right, to tell the truth and to live with integrity. People can try to attack your heart, but confidence in this righteousness will help protect you.

Soldiers wouldn’t take off their breastplate when in battle. Firefighters wouldn’t take off their protective jacket when inside a house that’s on fire. We therefore need to continue wearing the breastplate of righteousness throughout our life, by living in a way that is right and true.

3) Feet Fitted With Readiness

When fighting fires, they wear safety boots to protect their feet. These boots often have metal in them to protect their toes, while the soles of the boots have puncture resistant material in case they step on anything sharp (like broken glass or nails). This footwear also helps protect against burns.

It’s often said that as Christians, we’re to be the hands and feet of God. Having feet fitted with readiness means that we’re prepared to walk wherever God may take us – whenever that may be. This may be along an uncomfortable path, so these shoes are necessary to be able to do this.

4) Shield Of Faith

Soldiers used to carry shields into battle (maybe show a clip from Captain America to help illustrate this) – this helped protect against arrows, swords or any other weapons their enemy tried to attack them with.

Firefighters’ helmets often have visors or shields, protecting their eyes and face. They also sometimes carry protective shields to help protect themselves from falling debris, ensuring they don’t get crushed.

Similarly, the Shield of Faith in the Armor of God helps protect us from being crushed. More specifically, Ephesians says it protects us from the “flaming arrows of the evil one”. Arrows can be used in battles to attack from both close range and long range – you don’t always see them coming.

The Shield of Faith – our belief and trust in God – therefore helps protect us from unseen dangers, acting as a wall and barrier, while also protecting the rest of our armor.

5) Helmet Of Salvation

Soldiers wore a helmet to protect their heads from attack. Firefighters wear helmets to protect their heads from both fire and falling debris.

The Helmet of Salvation protects our minds from attack. Salvation is a free gift from God, one where He’s offered us eternal life. Keeping on the Helmet of Salvation therefore helps give you confidence in your identity and future, defending you against lies that the enemy may try to get inside your head.

6) Sword of the Spirit

The final item in the Armor of God is actually a weapon – as the saying goes, the best form of defense is offense (or for fellow Brits, the best form of defence is attack).

A soldier would carry a sword or another weapon to fight – without it, he’d be fairly useless. Similarly, a firefighter has a weapon at his disposal in the form of a firehose. The hose is what they use to actually fight the fire, hence the name of the job. They’ll battle against a fire but eventually, the sheer force of the water will win. They’ll also carry axes to be able to break down doors and windows.

As Ephesians says, the Sword of the Spirit is the Word of God – the Bible. The truth contained in scripture can be used to attack the enemy’s lies, although shouldn’t be used to fight people. Knowing God’s truth can help in the fight against sin, by being aware of how we should live our lives as God only wants the best for us.

Question: What else would you add to this Armor of God lesson? Share your ideas in the comments below.

You can also connect with us by:

  1. Signing up to receive our posts via email
  2. Following us on Twitter
  3. Liking us on Facebook
  4. Signing up to our RSS feed


How To Do A Risk Assessment

June 13, 2012 By Stephen Pepper Leave a Comment

How to do a risk assessmentOne of the most important safety considerations as a youth worker is knowing how to do a risk assessment. This is a method of identifying potential hazards you might encounter in your youth programs and evaluating if there’s anything that can be done to either prevent or reduce the risk of an accident occurring.

To help you know how to do a risk assessment, we’ve provided a step-by-step guide below. There are also free risk assessment templates for you to download – these are in Word format (so that you can edit if required) and PDF format.

1) Identify The Hazard

Hazards in youth work and youth ministry could be anything – there are so many possibilities that will vary based upon the activities you do, where your programs are run, etc. Here are some possible hazards to look out for:

  • Electrical hazards – faulty wiring, overloaded plug sockets, electrical appliances next to a water source
  • Mobility hazards – poor lighting, items left in walkways, uneven walking surfaces, upturned carpeting
  • Emergency hazards – blocked fire exits, lack of fire extinguishers
  • Activity hazards – hiking in the mountains, swimming, heatstroke, bonfires, chubby bunny
  • Other hazards – badly stacked items, lack of seatbelts in vans

2) Identify Who Might Be Harmed

Some hazards will affect everyone, such as electricity, bonfires or lack of seatbelts. Some people may be more susceptible to hazards than others though.

Therefore, take extra care when considering whether people – youth or adult volunteers/helpers – have particular needs. Some of the students may not be able to swim, a volunteer may have poor eyesight or a young person may be on crutches or in a wheelchair. Factors like these will affect their susceptibility to hazards.

3) Evaluate Risks

Now that you’ve identified the hazards, it’s time to evaluate the likelihood of the hazard occurring. If you’re going hiking in bad weather or the height of summer, you may deem the risk of slipping or dehydration to be high. Going swimming in a pool with two trained lifeguards will be regarded as a lower risk.

The likelihood of an incident occurring will depend on a variety of factors, whether that be adult to youth ratios, weather, location, activities, age of the youth, etc.

Once you’ve considered the chances of a hazard occurring, identify if you can eliminate the hazard completely or if there’s anything you can do to reduce the risk of it happening. Here are some examples of how this can be done:

  • Prevent access – if there’s a room or cupboard at your church or youth center that has hazardous materials in it, make sure it’s always locked
  • Avoid the hazard – when setting up a bonfire, ensure it’s away from flammable material, dry trees, propane tanks, etc
  • Choose less risky options – when going hiking, consider using a less dangerous route
  • Provide protective equipment – make sure all transportation has seatbelts
  • Organization – with bonfires, set up the seating a safe distance away yourself, rather than having the young people grab a chair and putting it too close to the fire
  • Knowledge – make sure everyone is aware of fire exits
  • First aid – always have a first aid kit on hand, along with someone trained in first aid
  • Communicate – make sure you have a fully-charged cell phone if doing activities in the middle of nowhere

4) Record Hazards And Risks And Implement Precautions

This section should be read in conjunction with the downloadable Risk Assessment template below:

Download Risk Assessment Template – Word

Download Risk Assessment Template – PDF

After identifying all the potential hazards and risks, write down the results of what you’ve found so that you have a record. This will serve as a good reference point when organizing activities and will prove that safety was considered in the event of an accident actually happening.

One way of recording hazards and risks is to rate them on a scale of severity and likelihood. The severity scale ranges from Negligible (1) to Very Severe (5), while the likelihood scale ranges from Very Unlikely (1) to Almost Certain (5).

Depending on your preference, you can choose to use either the colored scale or the numerical scale (whereby you multiply the two numbers together) in order to assess the overall risk for each hazard.

If a hazard falls within the yellow or red risk levels, or has an overall risk rating of eight and above, it’s worth considering whether it can be avoided completely, or whether anything can be done to lessen the potential harm or likelihood of it happening.

While identifying hazards and risk levels are important, setting out a plan to address hazards and lower the level of risk is the most critical part of the risk assessment process. To do this, look at each hazard individually and determine what action (if any) can be taken to reduce the likelihood or severity of the hazard – these are called control measures.

For example, if you’re going to be going swimming, potential hazards might include drowning, slip and fall accidents, horseplay/flips in water and sunburn/dehydration (if the pool is outside). In this example, you might list the following control measures:

  • Drowning – swimming listed on parental consent form (including water depth); provision of floatation devices and/or life preservers; lifeguard on duty; first aider present
  • Slip and fall accidents – pre-swimming safety talk; written rules on display; appropriate adult to youth ratio for supervision and correction
  • Horseplay/flips in water – pre-swimming safety talk; written rules on display; appropriate adult to youth ratio for supervision and correction
  • Sunburn/dehydration – safety talk about signs of sunburn and dehydration; sunscreen provided; water provided; limit swimming session time

n.b. This isn’t an exhaustive list of potential hazards or control measures – the responsibility falls on you, your team or your organization to identify and address all potential hazards and risks.

5) Communicate

If there are risks that your helpers or youth should be made specifically aware of, ensure that this is communicated to all of them (such as location of fire exits).

6) Review The Risk Assessment

Just before doing potentially hazardous activities, review the risk assessment again. Check whether any of the hazards have changed or if there are any new hazards. Other factors may have changes too – the weather may be worse than you were anticipating, or lifeguards may not be available at a swimming pool.

Update the risk assessment accordingly and ensure any necessary changes are communicated as appropriate.

Hopefully this guide means you now know how to do a risk assessment in order to keep your youth group safe.

Question: Do you have any advice on how to do a risk assessment? Please share any tips for best practice in the comments below.

You can also connect with us by:

  1. Signing up to receive our posts via email
  2. Following us on Twitter
  3. Liking us on Facebook
  4. Signing up to our RSS feed


Following Directions – Youth Retreat Theme

June 11, 2012 By Stephen Pepper Leave a Comment

Following directions youth retreat themeThis week’s youth retreat theme is all about Following Directions. We know that we get both faith based and non-faith based youth workers visiting our site, so we try to tailor our youth retreat themes so that they’re useful no matter what type of organization you work for.
In this Following Directions theme, the first part of each activity or discussion point can therefore be used by both faith based and non-faith based youth workers. There’s also a second section beneath most of the activities which have additional ideas for faith based retreats. I’ve written them as a Christian, but I’m sure many of the principles can also be used for those working with young people who are Muslim, Hindu, etc.

Following Directions – Game 1

Organize a treasure hunt/scavenger hunt that splits the youth into groups and sends the groups in different directions, but which ends up at the same finishing point.

Discussion: Explain that we’re all unique which means the directions we receive might be different to those received by someone else. For example, if your grades aren’t as good as your brother or sister, your parents might want you to spend more time on your homework. On the other hand, a sports coach may think you have more potential than other students, so may push you harder than he does with them.

Either way, it can be frustrating to receive different directions to other people, but that doesn’t mean the person giving the instructions doesn’t care about you – it could in fact be because they care so much that they’re giving you different directions to fulfill your potential.

Christian youth retreat: God has different plans for each of us that will take us on different paths. He’s also given us all different abilities and talents. This is great as it means that he treats us as unique individuals. And despite the different paths, we all have the same treasure waiting for us – eternal life with Him, no matter what path we take in our journey.

Following Directions – Game 2

Organize another treasure hunt, although this time only give half the youth correct directions. For the other half, you could miss off the final clue or give them a different final clue that sends them off somewhere else.

Discussion: Point out that it can be easy to trust that directions people give us are accurate, but sometimes they’ll take us down the wrong path and into trouble. This can therefore be a good opportunity to talk about issues relating to peer pressure – sex & relationships, stealing, integrity, etc.

Christian youth retreat: Encourage your youth to question things they’re taught as Biblical truth, including things you teach them. There can often be things that are taught as “Christian”, but which are more like cultural viewpoints than things the Bible says. Encourage them to be like the Bereans and search the Bible for themselves, instead of blindly believing things that they’re told.

Following Directions – Game 3

Have two youth come up to the front. One is given a picture and the other a flipchart that he has to draw on – make sure everyone in the room can see what he’ll be drawing.

The young person with the picture has to describe to the other young person how to draw the picture line by line, but without telling him what the picture is. For example, “Draw a horizontal line 6 inches long. At the end of the line on the right, draw a straight line upwards for 9 inches. At the end of that line, draw a diagonal line up and to the left for 4 inches, etc”.

Once they’re done, bring out an enlarged picture for everyone to see what it should have looked like.

Discussion: How different was the original picture from what was drawn? Following directions blindly can result in the wrong outcome if we’re not careful or listening to the wrong people.

Christian youth retreat: Similar to the point about the Bereans above, this is why it’s important to read the Bible for ourselves, rather than solely relying on what others tell us.

As a follow-up activity, give them a list of phrases where they have to determine if the phrase is from the Bible or not. Pick some phrases from the Bible and mix them in with the following phrases that sound like they’re from the Bible, but aren’t:

  • God helps those who help themselves
  • Cleanliness is next to godliness
  • The Lord works in mysterious ways
  • Money is the root of all evil
  • Charity begins at home

Following Directions – Activity

Go on a long hike with the young people. Do some planning in advance and find a route that requires some map-reading/orientation skills, or at least requires them to follow directions in order to find their way – make sure the youth are in charge of leading the way.

You could also turn the hike into a nature scavenger hunt.

(n.b. If you’re planning on doing both of the treasure hunt ideas, this might be too similar of an idea – the youth may get bored doing three similar activities over the course of the youth retreat)

Following Directions – Talk Ideas

If you’re going to be having meetings at the youth retreat, here are some further ideas for talks or discussion starters for small groups that can be expanded on:

One Degree Of Deviation

It can be easy to go slightly off the path and not follow directions. This can have natural and logical consequences though and can mean we end up much further away further down the path without realizing it.

Explain the concept of one degree of deviation. If you’re flying an airplane, being just one degree off means that for every mile you travel, you miss your target destination by 92 feet. It may not seem like a large gap, but the longer you travel in the wrong direction, the further you’ll be from where you should be.

Using the pilot analogy, if you set off flying along the equator and are one degree off, you’d finish almost 500 miles off target by the time you’d flown around the world.

The same goes for tunnels built from opposite ends. Show the video clip below – imagine how embarrassing this would have been if they’d been one degree out in their calculations!

Christian youth retreat: Explain that this is why it’s important to say sorry to God and get back on the right path.

GPS

It can be annoying having to follow directions from people all the time – parents, teachers, youth workers! Most of the time though, the directions we give young people are for their benefit.

When going on a road trip, you either ask for directions, look at a map or use a GPS. These all give directions so that you can find the right way to go – you follow these because you know they’ll take you where you want to go.

Christian youth retreat: It’s easy to think of God’s directions as just a bunch of rules and that He’s this super-controlling God. The directions are for our good though because He loves us and wants us to avoid the hurt and pain that can happen when we ignore them. Because He loves us so much though, He’s still given us the ability to choose whether or not we want to follow them.

Sports

Have the youth imagine sports without any directions or rules:

  • Soccer – where you can pick up the ball
  • Basketball – where you can push each other over
  • Football – where the defense can tackle before the ball is snapped
  • Volleyball – where you can catch the ball before hitting it back

They wouldn’t enjoy it – in fact, people would complain that it was unfair or not fun. We actually need rules and directions; not to prevent fun but because of the opposite – they often mean that we can have fun and enjoy ourselves.

Question: What activities do you use to address the issue of following directions with young people? Share your ideas in the comments below.

You can also connect with us by:

  1. Signing up to receive our posts via email
  2. Following us on Twitter
  3. Liking us on Facebook
  4. Signing up to our RSS feed


How To Calculate A Youth Retreat Budget

May 29, 2012 By Stephen Pepper Leave a Comment

Youth retreat budgetQ. I don’t know how to calculate a youth retreat budget – can you help?

A. Sure! There are a number of different expenses you’ll need to take into account when planning a youth retreat. Below is a list of some areas you’ll need to price out – they may not all apply to your retreat, so leave off any of these factors where you won’t incur any expense.

Youth Retreat Expenses

1. Youth retreat center – This is probably going to be the highest cost you’ll incur, so it’s important to price this correctly. When researching retreat centers, ascertain if the price quoted is based on a minimum number of youth attending, a ‘per youth’ basis or a mixture of the two. Also check to see what the cost includes; for example, are meals, activities, etc included?

2. Food – If the center isn’t providing meals, you’ll need to calculate the cost of food as part of the youth retreat budget. Even if the center does provide three meals a day, are snacks and beverages throughout the day included or will you need to bring those?

3. Speaker – Are you getting a guest speaker? If so, you’ll need to cover the cost of their place at the retreat and may well need to offer payment for their services.

4. Worship leader – For Christian youth retreats, you’ll probably be having a time of worship at some point. If you’re bringing along a worship leader, the cost for them will need to be covered, as well as payment if they’re a worship leader from outside the church.

5. Activities – Are you planning any activities either on or off-site that have some kind of cost involved? If so, include these costs. When booking group activities, you may be able to negotiate discounts for group bookings.

6. Travel & transport – How are youth getting to the retreat center? If parents will be taking them there and picking them up, there may be no cost for this area. If you need to hire a bus or minivan though include the cost of this, along with insurance, gas, parking, etc.

7. Resources – Are you creating your own curriculum for the retreat or planning on buying one? If buying resources, the cost could be included in the youth retreat budget. To save some money, check out our free youth retreat themes for ideas.

8. Subsidy – Some youth may not be able to afford to attend the retreat, so consider building in an extra amount to the youth retreat budget so that you can subsidize one or more places for students.

9. Prizes – If you’re organizing activities, games, etc, will you be offering prizes? Don’t forget to include these within the overall cost of the retreat.

10. Miscellaneous – There will no doubt be other miscellaneous expenses that aren’t listed above that are specific to your youth retreat. Take some time to think through everything that you’re planning so that nothing’s left off the budget.

Youth Retreat Budget Calculation

Now that you’ve identified all the different expenses, total these up.

Next, divide the total cost by the number of people on the youth retreat. Something to consider here is whether your volunteers will be paying for their own place on the retreat. If not, divide the total cost by the number of youth. If volunteers will be paying their own way, include them when dividing.

Youth Retreat Cost

Once you’ve performed this calculation, you’ll have the Total Cost Per Person. As suggested by the name, this is how much you’ll need to charge per person in order to keep within the youth retreat budget. You may also want to consider adding on an extra amount to the Total Cost Per Person to cover any unforeseen expenses or other expenses you forgot to include within the budget originally.

Youth Retreat Budget Calculator

If you buy a copy of How To Plan A Youth Retreat, as an added bonus you get exclusive access to a youth retreat budget calculator based on the list of expenses above. The calculator is a spreadsheet where you simply enter all the different amounts and the number of people attending your retreat – it will then automatically calculate the Total Cost Per Person for you.

In addition to the budget calculator, you also get access to more than a dozen other youth retreat templates and forms to help your planning – these are all fully customizable and downloadable. Get your copy now!

Question: What other expenses are worth considering when calculating a youth retreat budget? Let us know in the comments below.

You can also connect with us by:

  1. Signing up to receive our posts via email
  2. Following us on Twitter
  3. Liking us on Facebook
  4. Signing up to our RSS feed


« Previous Page
Next Page »

501 Would You Rather Questions

501 Would You Rather Questions

52 Scavenger Hunt Ideas

52 Scavenger Hunt Ideas cover

How To Plan A Youth Retreat

How To Plan A Youth Retreat cover

Categories

Best Of Youth Workin' It
Book Reviews
Guest Post
Spotlight on Youth
Types Of Youth Work
Would You Rather Questions
Youth & Society
Youth Group Activities
Youth Group Fundraiser
Youth Group Games
Youth Retreat
Youth Work Program Administration
Youth Work Q & A
Youth Work Session Plan Ideas
Youth Worker Stuff
Youth Workin' It Stuff

Tags

Administration Balloons Boundaries Budget Christmas Communication Facebook Food Food Games Global Issues Global Youth Work Goal Setting Group Development Group Games Guest Posts Interview Skills Life Skills Parents Planning Policies and Procedures Relationships Relay Games For Teenagers Scavenger Hunt Ideas School Self-Esteem SMART Social Media Strategic Planning Team Building Twitter Up Front Games Volunteering Volunteers Water Games For Youth Would You Rather Youth Behavior Youth Cartel Youth Group Bonding Youth Participation Youth Retreat Center Youth Retreat Themes Youth Scavenger Hunt Youth Work Definition Youth Work Resources Youth Work Training

Search Youth Workin’ It

All Content © Copyright 2011-2025, Stephen & Shae Pepper, youthworkinit.com